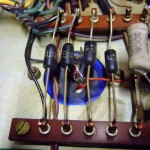
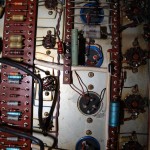
This Hiwatt PA is quite original. Transformers, knobs, Capacitors were all as new with date codes and appropriate levels of corrostion from the early 70s. There is evidence of some earlier repairs e.g. the rectifying diodes are not very straight and some resistors have clearly been replaced at some point. If you have never seen inside a Hi watt amp then you are in for a treat. They are literally the neatest amps going resembling something of an underground railway map in different coloured wires neatly routed around the chassis.
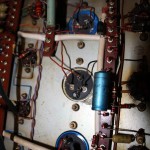
The amp’s fault was that the sounds was fading out and very erratically. Upon opening the amp up it clearly had signs of ruptured capacitors so I decided to start with a re-cap job where all the electrolytics are replaced. Like many amps of this era the Hiwatt uses three pin capacitors. These are simply two capacitors in one can with a common terminal. Locating these is not easy though however the excellent Watford Valves was offering F&T capacitors that meet this specification. So I picked up a set of these, all cathode decoupling capacitors and power amp coupling capacitor. That is all the electrolytics covered and costs around £50 to do.
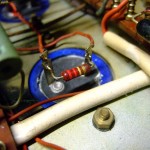
Having replaced all the capacitors it’s always best to check, check and double check that you have polarity correct. Consequences of incorrect polarity are devastating so all ways play safe.
Once up and running the amp was sounding very nice and clear. Immediately you want to start playing one of Pete’s solos from Live at Leeds. For whilst this is a PA head the power amp stage is identical to the Lead heads it’s just got six channels to play with. These PA heads don’t seem to attract the silly money that guitar amps do so for my money I like them.